Showing posts with label roombox. Show all posts

Saturday, January 13, 2018

collecting and diplaying one inch scale miniatures...

I've been collecting miniatures since I was a child. Way back then the miniatures were all different scales and mostly cheap things bought at the local five and dime store. I still have a bunch of those old miniatures in my collection and now they are considered kitschy vintage, lol. About ten years ago I started going to miniature shows (such as the Good Sam Showcase of Miniatures) and my collecting turned to artist made miniatures and higher end commercially made miniatures.
Miniatures are perfect for collecting because they don't take up much space to keep and display... until your collection out grows your space and you can't display everything. This is a huge problem because I want to see and enjoy my collection daily, not just store them in a box. So in my search for a better way to use my allotted display space I came upon a labor intensive, hand crafted, four room display box attached to a turn table (lazy Susan). I thought the idea was brilliant and rushed off to beg Leslie to have a kit made to sell through Alpha Stamps. And that is how the 4 Season Spinner was born. Of course my name was vetoed in favor of calling it the Rotating 4 Scene Room Box but no biggie, as I still got to make the first one for myself.
 Isn't it fabulous!? Four whole rooms to decorate!
 I decided to do the four seasons as a theme for this first one. (Yes, I will be making more because it is super easy to construct and I was able to display sooooo much stuff!) The first two rooms I decorated are Spring and Summer. It took so long to do the decorating on these rooms that you will not get to see Fall and Winter until next month when I finish them. Anyway, here's Spring in all her Easter bunny glory...
 I love the Easter Bunny wall paper, so Springy! I must admit most of the smaller stuff in this room is from my collection and is either vintage, handmade, artist made or no longer made. But there is a supply list of the available items, here. Remember, decorating a room like this gives you an excuse to start collecting or to start displaying your collection.
Let's take a look at beautiful, dreamy Summer...
 I decided to do a Victorian style boudoir to represent Summer because I had tons of stuff to use. You may remember the dresser from a previous post. I love the way the dresser turned out so decided to keep it. I did use a bunch of stuff in this room that is actually available, YAY!. Here's the supply list. (Also, the shoes are made by Sylvia Roundtree, (The Doll's Cobbler) and are amazing. But the chair is vintage and was snatched up by me on eBay.)
 By the way, I didn't use permanent glue to attach my stuff to the room this time since I was keeping this for myself and I may want to change things up at some point in the future. I used Bluestik Reusable Adhesive Putty instead of glue. It's cheap and works amazingly well.
Wow! Thanks for staying to the end :) I hope you are inspired to make your own 4 Season Spinner or maybe it will be four of your favorite time periods (18th Century would be fab!) or four rooms inspired by your children or pets, or four fairy tale inspired rooms. The sky's the limit!

Saturday, March 25, 2017

the memory keeper's room...

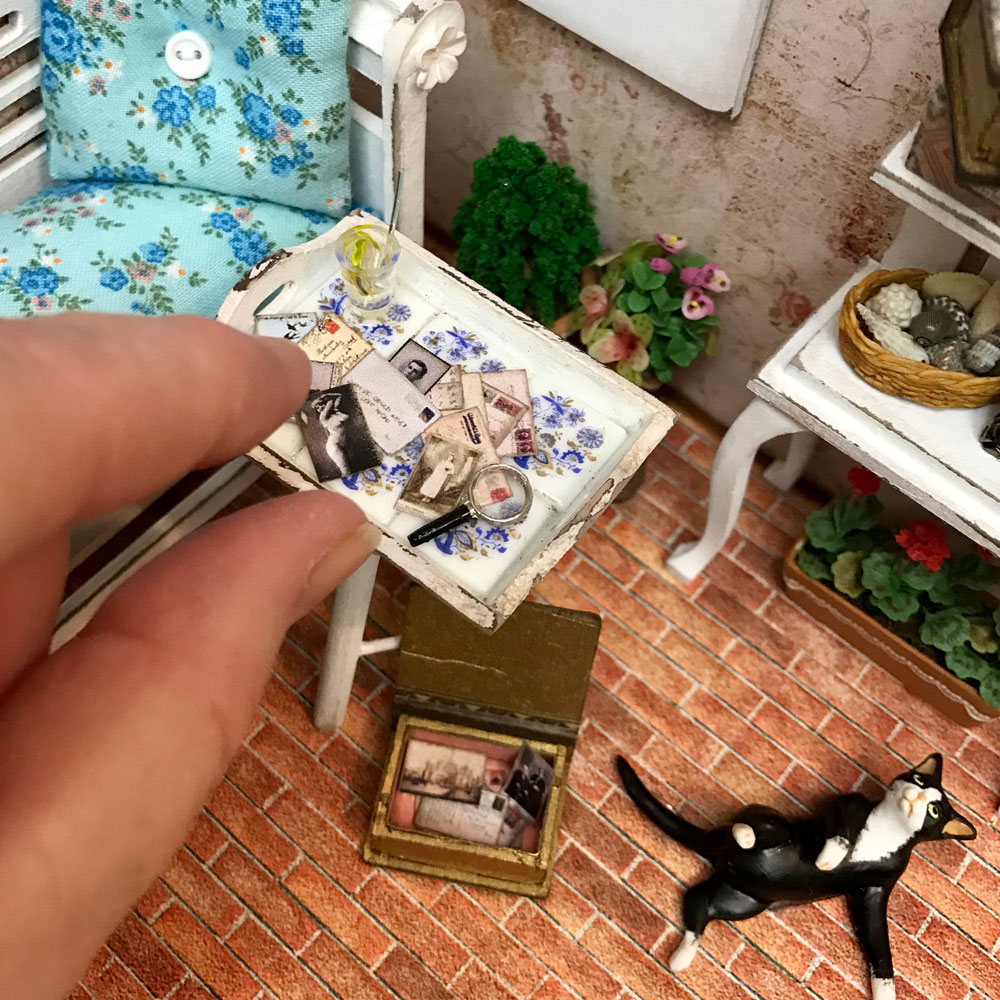
 This little shabby chic roombox is a tribute to all of you out there who collect vintage ephemera and photographs. I started collecting when I was a child because I spent a lot of time with my Great Grandmother, who was a collector. I still get a thrill when I find a particularly interesting old postcard or well worn love letter. The memories attached to these treasures may not be my own, but they still speak to me and inspire me to imagine a long past world so different from my own.
 As you can see, the focus of this room is the tray filled with old letters, postcards and photographs. There is even a magnifying glass for closer inspection. Below the tray is an open faux book box, with more photos and ephemera, waiting patiently for perusal. A couple more faux book boxes on the shelf await their turn as well.
 I felt this room really needed a window to look out of (while daydreaming) so I used a set of Dollhouse Windows with Shutters 1:12 to add one. The image I used behind the window wasn't quite tall enough to fill the whole window sooo... I made a decorative window shade out of a toothpick and some cardstock to hide it. I just glued the cardstock around the toothpick, added a piece of cardstock to the back so it hangs down and glued filigree beads to the ends. A small piece of white Dresden trim adds a finishing touch.
 I love cats, so I always try to put a cat or two (or three or four!) in any room box I make and this one is no exception. There's a mama cat and three kittens (who are really half scale cats that work purrfectly as kittens!)
I thank you for stopping by my blog and hope to see you again! Remember to take time to daydream and use your imagination :) Now run along and create something!
Supply list is available here.

Saturday, August 20, 2016

packing for a trip to Transylvania...

I've been really intrigued by miniature luggage lately, as Alpha Stamps has several new laser cut luggage options. After making up several of the pieces (okay... one of each), I realized I had a lovely matching set of luggage and had to make a room box to showcase it...
I'm a Goth at heart so my luggage and room box is certainly creepy enough to house a miniature girly vampire packing up her gear for a trip to Transylvania (hence, the title of this post). Boy do I love black, white and red together! It's so striking and works well with skulls and taxidermy too.
I had to paint all of my hardware black to match the paper I used but it was well worth the effort. Speaking of painting... I painted all of my furniture, too, and it was really easy to do.
 First I carefully stripped off all of the upholstery so I could reuse it.
Next I removed the glue residue with Goof Off.
Then I used the same technique I used on the furniture in Rose Ella's reading room to complete the task. I love how it turned out and I wish I had time to make over some of my life size furniture, lol.
 The base of my room box is two Corner Room Boxes that I glued together...
 I filled the gap in with a bit of Apoxie Sculpt Clay.
Once you cover the whole thing with paper, you can't even tell it's been cobbled together. Note: The paper I used is several years old and no longer available :(
 When I build a miniature scene in a room box, I like to add the pieces I plan to use slowly and move them around until I find just the right balance...
 I usually glue everything down, but, this time I decided to use Museum Wax to fix the pieces in place so I could redecorate later if I want to :)
 The Steamer Trunk looked really naked on top so I added a playful kitty...
 and some books and letters...
 Pretty soon the whole thing was nicely full and cozy.
By the way, I created a collage sheet with drawers for the new Steamer Trunk but I ended up using them inside out because they clashed with my black and white damask exterior paper, lol.
I hope you enjoyed my post today and are inspired to make your own room box or a set of little luggage or both! Here's a link to my supply list. Now go create something awesome!


Saturday, June 18, 2016

a brocante summer cottage...

Brocante is the French version of a flea market and an awesome place to find loads of sweet and unique items to furnish a summer cottage. Like most people, I don't own a summer cottage but I really wanted to decorate one with finds from the brocante, soooo... I created a 1:24 scale cottage using the new Half Scale Room Box with Slanted Roof, a Half Scale Bay Window and a Cottage Base - 9x9x1.
I really enjoyed building and furnishing this tiny cottage and I think it turned out pretty cute...
I used Sheet Moss to cover the roof (to give it a fairy garden feel) and covered it in a distressed stucco paper I found in the Provincial 6x6 Paper Pad. The flagstone patio is a 12x12" sheet of Provincial Cobblestone Scrapbook Paper. I really love that scrapbook paper companies are offering so many realistic background and architectural papers currently.
My fence was made using Mini Chipboard Gothic Fence that I dry brushed with white chalk paint and hot glued around the base.
I used a Mini String of Fairy Lights to light up my tree, and two of the new Half Scale Tulip Ceiling Lights to light up the interior of my cottage. To conceal the lighting wires I ran them under the paper I used to cover the ceiling like this:
 The area above the ceiling has a small empty space where you can put the 9v Battery Converter for Half-Scale Lights and when the roof is in place you don't see them at all.
I furnished my cottage with (new and awesome!) Half Scale Princess Love Seat, Table & Chairs Set that I painted with pink and white chalk paint then antiqued it a bit with some brown acrylic paint to give it shabby chic style. The adorable Half Scale Metal Tea Set sitting on the coffee table was painted with Vintaj Metal Patinas. I used Marble from the Painted Barn Set and Onyx from the Retro Highway Set. Here's an easy way to paint tiny things without making a mess:
I use long toothpicks, Loctite Mounting Putty (bought in the hardware section of Walmart) and a floral Styrofoam form to hold everything until dry and ready to use in my miniature scene. 
Lastly, there is the (another NEW thing!!) Half Scale Princess Table & Chairs Set. I modified my table by drilling a hole in the top and adding a cocktail umbrella that I painted (with chalk paint... love the stuff!).
The tiny book on the chair was made using an image from my latest collage sheet, Half Scale Books & Things Collage Sheet. The dog, cat, and cheese/wine tray are from a miniature store, but, you can buy the tiny wine bottle here.
Wow, that was a long post... I feel like I've been nattering on for ages! I hope I have inspired you to make your own brocante summer cottage or maybe a witches cottage or a garden shed or how about a fairy house... the possibilities are endless!
Thanks for stopping by and reading my post! It is much appreciated. If you would like to see a supplies list click here.