Showing posts with label miniature furniture. Show all posts

Saturday, January 13, 2018

collecting and diplaying one inch scale miniatures...

I've been collecting miniatures since I was a child. Way back then the miniatures were all different scales and mostly cheap things bought at the local five and dime store. I still have a bunch of those old miniatures in my collection and now they are considered kitschy vintage, lol. About ten years ago I started going to miniature shows (such as the Good Sam Showcase of Miniatures) and my collecting turned to artist made miniatures and higher end commercially made miniatures.
Miniatures are perfect for collecting because they don't take up much space to keep and display... until your collection out grows your space and you can't display everything. This is a huge problem because I want to see and enjoy my collection daily, not just store them in a box. So in my search for a better way to use my allotted display space I came upon a labor intensive, hand crafted, four room display box attached to a turn table (lazy Susan). I thought the idea was brilliant and rushed off to beg Leslie to have a kit made to sell through Alpha Stamps. And that is how the 4 Season Spinner was born. Of course my name was vetoed in favor of calling it the Rotating 4 Scene Room Box but no biggie, as I still got to make the first one for myself.
 Isn't it fabulous!? Four whole rooms to decorate!
 I decided to do the four seasons as a theme for this first one. (Yes, I will be making more because it is super easy to construct and I was able to display sooooo much stuff!) The first two rooms I decorated are Spring and Summer. It took so long to do the decorating on these rooms that you will not get to see Fall and Winter until next month when I finish them. Anyway, here's Spring in all her Easter bunny glory...
 I love the Easter Bunny wall paper, so Springy! I must admit most of the smaller stuff in this room is from my collection and is either vintage, handmade, artist made or no longer made. But there is a supply list of the available items, here. Remember, decorating a room like this gives you an excuse to start collecting or to start displaying your collection.
Let's take a look at beautiful, dreamy Summer...
 I decided to do a Victorian style boudoir to represent Summer because I had tons of stuff to use. You may remember the dresser from a previous post. I love the way the dresser turned out so decided to keep it. I did use a bunch of stuff in this room that is actually available, YAY!. Here's the supply list. (Also, the shoes are made by Sylvia Roundtree, (The Doll's Cobbler) and are amazing. But the chair is vintage and was snatched up by me on eBay.)
 By the way, I didn't use permanent glue to attach my stuff to the room this time since I was keeping this for myself and I may want to change things up at some point in the future. I used Bluestik Reusable Adhesive Putty instead of glue. It's cheap and works amazingly well.
Wow! Thanks for staying to the end :) I hope you are inspired to make your own 4 Season Spinner or maybe it will be four of your favorite time periods (18th Century would be fab!) or four rooms inspired by your children or pets, or four fairy tale inspired rooms. The sky's the limit!

Wednesday, July 12, 2017

wise woman's apothecary cabinet...

The Oxford Dictionary defines "wise woman" as a woman considered to be knowledgeable in matters such as herbal healing, magic charms, or other traditional lore. That is the kind of woman I envision using this apothecary cabinet.
She would keep all of her herbs and other ingredients in well labeled, tightly covered, glass jars so nothing would be misplaced or misused.
 She would have lots of books, scrolls, and papers to fill up those two large drawers, and yes, sometimes, to leave stacked on the worktop. Her mortar and pestle would be well used and perhaps a bit dented.
 Her apothecary cabinet would be kept orderly and well stocked.
I used the brand new and wonderfully versatile Storage Hutch and 4 Inch Wide Chest of Drawers - 2 Drawers as the base for my apothecary cabinet. A bit of Dresden trim, some box feet and four skulls, used for drawer pulls, helped give the cabinet a spooky style.
Using my recently designed Tiny Little Grimoires Collage Sheet I made an open book to display on the cabinet worktop. I took photos while I assembled it so I could do a little tutorial to share :)

Carefully cut out the following pieces from the collage sheet. You will also need to cut out a piece of patterned or colored paper to use as a backing to the book cover.
 Glue the backing paper to the back of the book cover, print or color side out.
Trim off any excess paper.
 Ink the edges of the book pages and the cover.
 Score the pages as shown below.
 Glue the first set of pages as shown below.
 Using a large wooden dowel or a pen, bend your pages as shown, to give them the curve of open book pages.
 If you want a ribbon book mark, glue a thin ribbon to the book as shown.
 Next, glue the curved pages into the middle of your book as shown.
 They should look like this from the side.
 Continue to glue the curved pages on top of each other until you have a stack you like.
 It will look more realistic if some of the pages are slightly offset and a corner or two is bent.
 Next, glue the ribbon in place as shown.
 Then, using sharp fabric scissors, cut the ribbon to size and trim the end into a v shape.
 Glue a couple of papers on top if you want your book to look like it's in use.
 There you have it! Just a few simple steps to making an open book for your miniature scene :)

I hope you enjoyed this post and thanks for taking the time to read it. If you would like to view my supplies list, it can be found here.

Wednesday, April 26, 2017

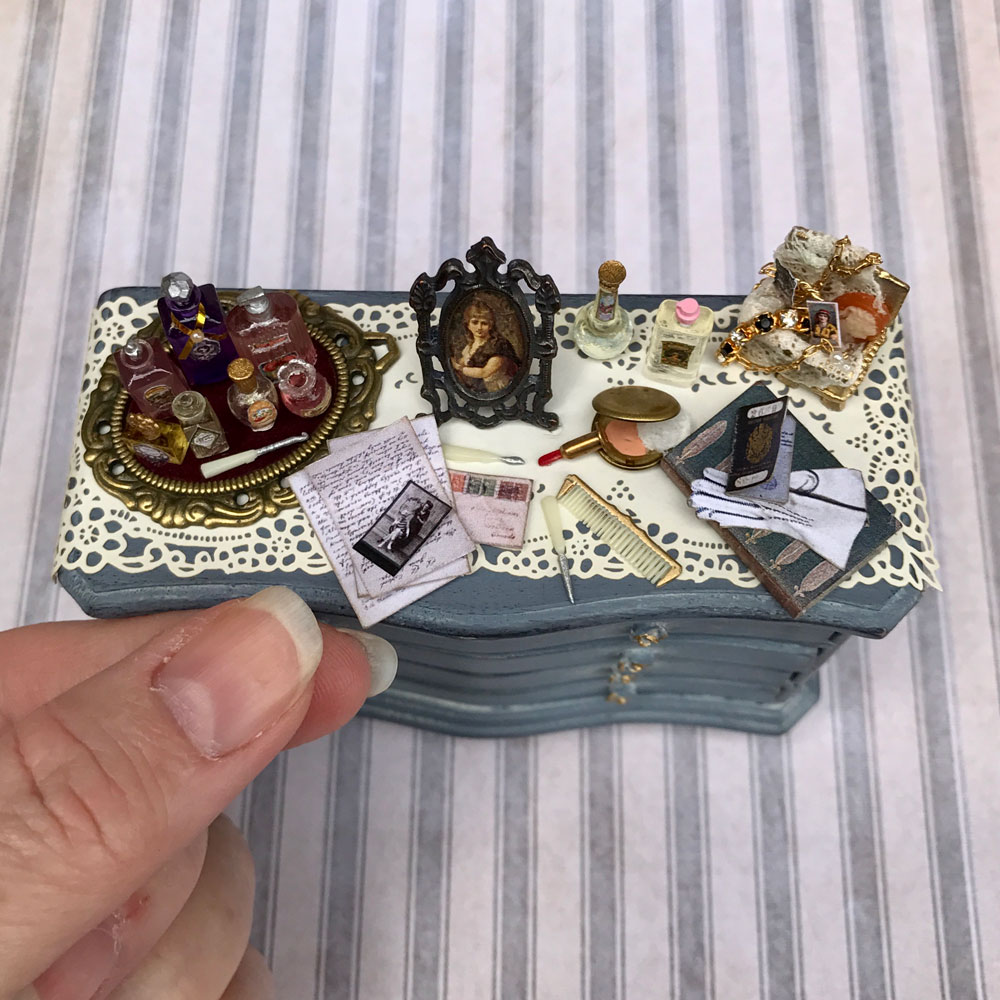
a lady's dresser...

 Believe it or not, this beautiful shabby chic dresser started out as an unfinished dollhouse dresser that looked like this:
I used Folk Art Home Decor Chalk paint in Nantucket Blue and Folk Art Home Decor Wax in White to achieve the shabby chic look (I bought both at my local Jo-Ann Fabric and Craft Store). The tiny roses, I used as handles, were sculpted from polymer clay and glued on before I painted. You could probably use 6mm metal roses to get a similar look if you aren't into sculpting with clay. I dabbed a bit of metallic gold paint on to the roses so they didn't blend in with the dresser paint too much.
 When I was ready to "dress" my dresser, I glued down a Dollhouse Laser-Cut Table Runner. Then I lined the tiny drawers with some scrapbook paper I had leftover from a previous project.
Many of the elements used on this dresser came from a collage sheet I created with tiny things to use in a lady's boudoir. I cut out the tiny little perfume labels using sharp pointed scissors and a pair of tweezers. A Wax Pick-Up Pencil is great for holding the labels while applying glue and then adhering the label to the perfume bottle.
Some of my favorite items in this dresser are the tiny stack of love letters tied up with a bow in the top drawer and the little stack of matching decorative boxes. 
To create the love letters I simply cut out a bunch of the envelopes from my A Lady's Boudoir Ephemera Collage Sheet, folded and glued them, then glued them together to form a stack. I then glued a band of ribbon around them, tied a tiny bow in a matching piece of ribbon and glued it on top of the band.
Tip: I find it's often easier to use two pairs of tweezers in place of my giant fingers when tying a tiny bow. I use 2mm silk ribbon (often sold as an embroidery ribbon) as it is tiny and quite flexible.
The stack of boxes was also cut out of A Lady's Boudoir Ephemera Collage Sheet. 
 To create a stack of your own cut, fold and glue the three boxes (from the collage sheet) together. Then apply a strip of Tiny Gold Line Stripe Tape around the biggest lid and glue a perfume label over top. Next glue the lids onto the boxes then glue the boxes together. When the glue is dry glue a band of ribbon around the boxes and tie a tiny bow in a matching piece of ribbon and glue it on top of that band.
Thanks for stopping by and reading about my little dresser. If you'd like to make one of your own you can find my supply list here
Have a fun and creative week :)