Showing posts with label Victorian. Show all posts

Saturday, March 3, 2018

Easter celebration boxes...

Alpha Stamps has a new monthly kit out today and I helped design it :) Since Easter is on April 1st (April Fools Day, lol) this year, March's kit is Easter themed. Some of the things in the kit are gorgeous papers from Bo Bunny, an adorable Happy Easter collage sheet from Catnip Designs (me), and a sweet shadowbox with an egg shaped cover. Here's a photo of the box I made using the kit along with some other goodies...
Isn't it sweet? There are three other shadowboxes and lids available, in the Easter theme, that get progressively larger in size. I, of course, had to make one of each...
I used paper from the new Jubilee 6x6 pad for this cute bunny box. In the box is a nest I built with eggs from the kit nestled inside it.
This adorable chick box has a vintage bunny girl ornament holding a fuzzy yellow chick and Easter basket inside.
*Note: It's a good idea to reinforce that little piece of die-cut chipboard between the chicks legs. I just glued a small piece of toothpick to the back of mine.
 This chocolate bunny box is my favorite! I made an Easter tree decorated with vintage colored eggs, a vintage basket and vintage look bunnies that are available at Alpha Stamps :)
Look how cute that bunny is...
And, yes, I did add Easter grass and colored eggs to that tiny basket!
Here's a photo of the whole group...
I bet you're wondering what that thing in the middle is, am I right?
Here's a closer look...
I love the the shutters we recently got in from Prima so I had to incorporate them into my Easter group. Amazingly, the rabbit cover from the Easter Covers for Mini Shadowboxes set fits inside the shutters perfectly. How cool is that :)
Now, I wanna share a little tutorial with you on making your shadowboxes deeper than they actually are. Although the depths range from 7/8" to around 1 1/2" and may be just fine to accommodate a paper collage or thinner multi-media vignette, I chose to use fatter items to create my vignettes. This made me scramble to create more space! Here's how I did it...
 Build your shadowbox and ink or paint any areas that may peek through the paper you cover the box with.
 Cover your box with paper inside and out.
 Paint your box cover on both sides as well as the edges. Notice I removed the tabs used to make this a removable cover.
 Paper your cover and cut out the egg shaped window with a craft knife. Then carefully fold the edges of the cover around the shadowbox to ensure a proper fit.
 Cut up a small cork, dowel or piece of balsa wool into four equally sized pieces. Mine are 1/4".
 Create a cute vignette inside the shadowbox. Hot glue the four pieces of cork/wood to the corners of the shadowbox so they don't stick out beyond the outer edges.
Lay the cover over the cork/wood pieces and fold the edges down into place.
Holding the cover in place, as shown above, lift up one flap and run a strip of hot glue along the shadowbox edge. Press the flap down until the glue cools. Repeat until all four sides are permanently glued down. That's all there is to it.
So who's ready to start making some cute Easter boxes?? Come on! You know you want to!
You can find my complete supply list at this link


Saturday, January 13, 2018

collecting and diplaying one inch scale miniatures...

I've been collecting miniatures since I was a child. Way back then the miniatures were all different scales and mostly cheap things bought at the local five and dime store. I still have a bunch of those old miniatures in my collection and now they are considered kitschy vintage, lol. About ten years ago I started going to miniature shows (such as the Good Sam Showcase of Miniatures) and my collecting turned to artist made miniatures and higher end commercially made miniatures.
Miniatures are perfect for collecting because they don't take up much space to keep and display... until your collection out grows your space and you can't display everything. This is a huge problem because I want to see and enjoy my collection daily, not just store them in a box. So in my search for a better way to use my allotted display space I came upon a labor intensive, hand crafted, four room display box attached to a turn table (lazy Susan). I thought the idea was brilliant and rushed off to beg Leslie to have a kit made to sell through Alpha Stamps. And that is how the 4 Season Spinner was born. Of course my name was vetoed in favor of calling it the Rotating 4 Scene Room Box but no biggie, as I still got to make the first one for myself.
 Isn't it fabulous!? Four whole rooms to decorate!
 I decided to do the four seasons as a theme for this first one. (Yes, I will be making more because it is super easy to construct and I was able to display sooooo much stuff!) The first two rooms I decorated are Spring and Summer. It took so long to do the decorating on these rooms that you will not get to see Fall and Winter until next month when I finish them. Anyway, here's Spring in all her Easter bunny glory...
 I love the Easter Bunny wall paper, so Springy! I must admit most of the smaller stuff in this room is from my collection and is either vintage, handmade, artist made or no longer made. But there is a supply list of the available items, here. Remember, decorating a room like this gives you an excuse to start collecting or to start displaying your collection.
Let's take a look at beautiful, dreamy Summer...
 I decided to do a Victorian style boudoir to represent Summer because I had tons of stuff to use. You may remember the dresser from a previous post. I love the way the dresser turned out so decided to keep it. I did use a bunch of stuff in this room that is actually available, YAY!. Here's the supply list. (Also, the shoes are made by Sylvia Roundtree, (The Doll's Cobbler) and are amazing. But the chair is vintage and was snatched up by me on eBay.)
 By the way, I didn't use permanent glue to attach my stuff to the room this time since I was keeping this for myself and I may want to change things up at some point in the future. I used Bluestik Reusable Adhesive Putty instead of glue. It's cheap and works amazingly well.
Wow! Thanks for staying to the end :) I hope you are inspired to make your own 4 Season Spinner or maybe it will be four of your favorite time periods (18th Century would be fab!) or four rooms inspired by your children or pets, or four fairy tale inspired rooms. The sky's the limit!

Wednesday, April 26, 2017

a lady's dresser...

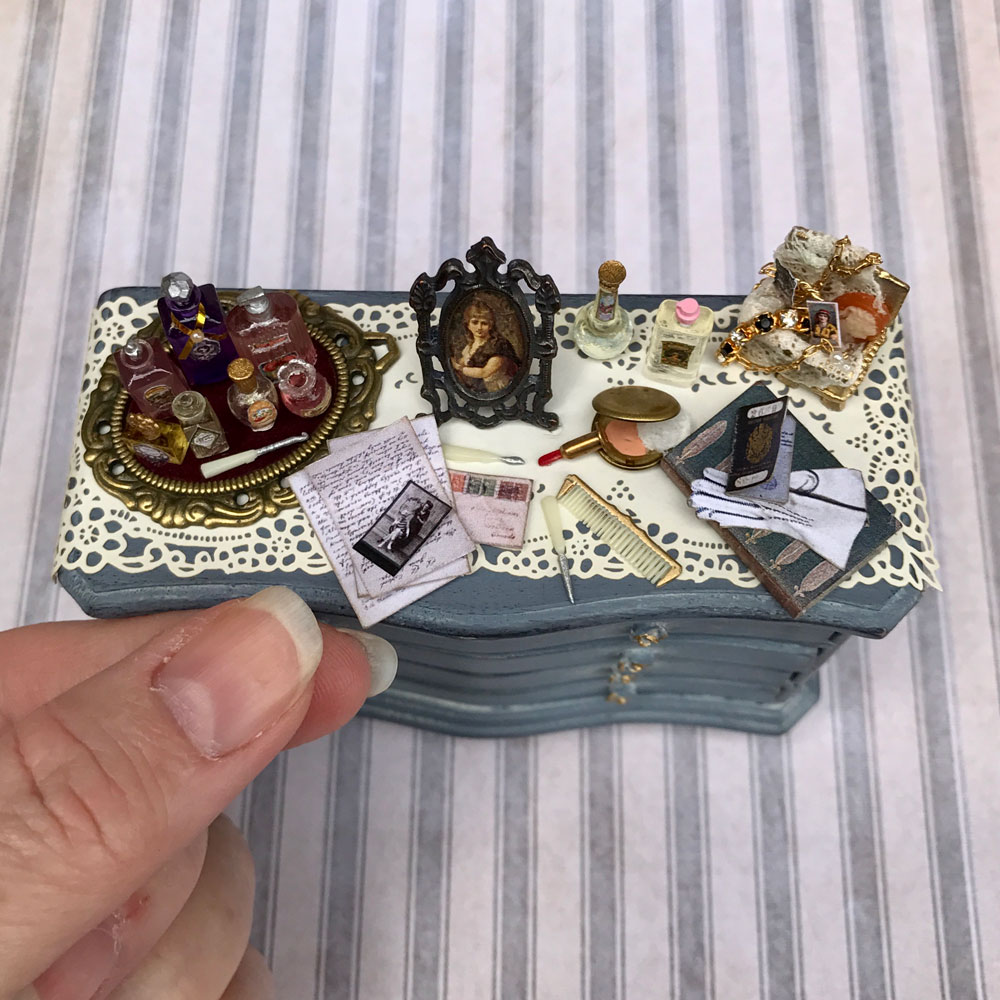
 Believe it or not, this beautiful shabby chic dresser started out as an unfinished dollhouse dresser that looked like this:
I used Folk Art Home Decor Chalk paint in Nantucket Blue and Folk Art Home Decor Wax in White to achieve the shabby chic look (I bought both at my local Jo-Ann Fabric and Craft Store). The tiny roses, I used as handles, were sculpted from polymer clay and glued on before I painted. You could probably use 6mm metal roses to get a similar look if you aren't into sculpting with clay. I dabbed a bit of metallic gold paint on to the roses so they didn't blend in with the dresser paint too much.
 When I was ready to "dress" my dresser, I glued down a Dollhouse Laser-Cut Table Runner. Then I lined the tiny drawers with some scrapbook paper I had leftover from a previous project.
Many of the elements used on this dresser came from a collage sheet I created with tiny things to use in a lady's boudoir. I cut out the tiny little perfume labels using sharp pointed scissors and a pair of tweezers. A Wax Pick-Up Pencil is great for holding the labels while applying glue and then adhering the label to the perfume bottle.
Some of my favorite items in this dresser are the tiny stack of love letters tied up with a bow in the top drawer and the little stack of matching decorative boxes. 
To create the love letters I simply cut out a bunch of the envelopes from my A Lady's Boudoir Ephemera Collage Sheet, folded and glued them, then glued them together to form a stack. I then glued a band of ribbon around them, tied a tiny bow in a matching piece of ribbon and glued it on top of the band.
Tip: I find it's often easier to use two pairs of tweezers in place of my giant fingers when tying a tiny bow. I use 2mm silk ribbon (often sold as an embroidery ribbon) as it is tiny and quite flexible.
The stack of boxes was also cut out of A Lady's Boudoir Ephemera Collage Sheet. 
 To create a stack of your own cut, fold and glue the three boxes (from the collage sheet) together. Then apply a strip of Tiny Gold Line Stripe Tape around the biggest lid and glue a perfume label over top. Next glue the lids onto the boxes then glue the boxes together. When the glue is dry glue a band of ribbon around the boxes and tie a tiny bow in a matching piece of ribbon and glue it on top of that band.
Thanks for stopping by and reading about my little dresser. If you'd like to make one of your own you can find my supply list here
Have a fun and creative week :)


Saturday, October 31, 2015

Little Deer's Christmas Countdown...

Feels a bit strange writing this post on Halloween as it is about counting off the days before Christmas, lol. Anyway, I have created a cute snowy Advent Calendar using the new Advent Calendar Shadowbox from, bet you can guess, Alpha Stamps.
I love this advent calendar shadowbox because once you put it together is feels like you have an item of heirloom quality that can be passed down for generations. It is laser cut from a nice heavy Masonite and it glues together like a dream. But, if you're a bit sketchy on how it pieces together, you can always pop on over to Glitter Tart's (Caroline Ouzts-Hay) blog where she has a video tutorial waiting just for you!
How sweet are the drawers I made using the provided template from the advent calendar shadowbox and the gorgeous new A Victorian Christmas Scrapbook Paper Set from Prima Marketing. This paper is rich with deep reddish burgundy and beautiful golden cream and really lends a warm homey touch to your Christmas project.
I used Hitch Fasteners for the drawer pulls and a set of Faux Metal Number Plates 1 to 25 to finish off my drawers.
 If you're wondering where I got that dear deer, I'm sorry to say it's been in my stash for a while and I'm not sure... But, Leslie, has provided an adorable alternative that's just about the same size :) And... since you can have a deer in your shadowbox, why not a tree and some snow covered hills. Here's how I made mine...
 After gluing the "floating" 25th cubby where I wanted it, I hot glued a couple of Icy Branches on top of it in the manner of a tree. I then cut a couple of pieces out of a round piece of floral (green) Styrofoam and hot glued them in place to form the base of the hills.
 To further smooth and shape, the hills, I used Apoxie Sculpt Epoxy Clay - White right over the Styrofoam.
 Once the Apoxie Sculpt cured, overnight, I hot glued sections of a White Picket Fence in place on the hills.
The fun part was adding lots of Dimensional Snow - 2 Ounce Jar to my scene. I used a medium stiff bristle paint brush to apply and arrange the "snow" just where I wanted it.
I let the "snow" dry overnight and then hot glued the deer and other goodies in place. 
If you'd like to buy your own goodies, you can find my full supply list here.
This was really a fun project to work on and it has made me want to make lots more projects for Christmas! I hope you will stop by again soon to see what I've been creating :)

Saturday, April 4, 2015

happy Easter...


Feel free to use the above vintage Easter image in your artistic endeavors and enjoy your day.