Showing posts with label skeleton. Show all posts

Saturday, June 24, 2017

a dia de los muertos (day of the dead) cat mermaid shrine??

Well, why the heck not? I love cats, day of the dead shrines and mermaids are really apropos right now. Last but not least, Alpha Stamps is doing mermaids this month and I really wanted to participate (not be left out, lol). So, I created a collage sheet with mermaid parts to fit the awesome Articulated Mermaid Paper Doll so you can make this...
Isn't she cute?? I love her, she has so much attitude! Anyway, you could just make a mermaid (or two) with the new collage sheet and be done with the whole thing... or you could make a whole day of the dead shrine to house her in!
 I made a shrine because I really do love day of the dead shrines and never need an excuse to make one.
 The shrine is composed of an Arched Shrine Shadowbox, a Balcony Balustrade - 12 Inch, and a brand new Stairstep Shrine Base. Plus a whole bunch of brightly painted doodads...
I used the Tiny Scalloped Shingles or Scales Stencil - 5x5 Size to add some texture to the top of the shrine base...
Of course I used Nuvo Embellishment Mousse - Aquamarine to push through the stencil because this stuff is the most amazing thing on the planet! Not only is it awesome to paint with and dimensional enough to hold its shape through a stencil, it is iridescent and comes in some luscious colors too!!! It's now available in nine colors at Alpha Stamps. (To see the colors I used click on my supply list for this project.)
 I attached my little mermaid to the interior of the shrine by gluing her to a couple of Small Wooden Spools then gluing the spools to the shrine wall. Makes her look like she's swimming around inside the shrine :)
 Someone has left her a yummy offering of chocolate mice and some lovely marigolds (which are really Tiny Paper Roses - Orange because I have yet to find miniature marigolds). The chocolate mice were made by a lovely miniaturist in England. I purchased them a few years ago on eBay.
Thanks for stopping by and reading all the way to the end. I hope you enjoy making your own day of the dead mermaid kitty and shrine :)


Wednesday, May 24, 2017

spiderweb, a Halloween shadowbox...

 More Halloween art, today, with a small witchy diorama/shadowbox. Super easy to create using the Small Frame Shadowbox, mostly painting, cutting, pasting and a bit of sewing (to make a felt witches hat). The hat, or one like it, will be an upcoming kit at Alpha Stamps in mid July. So stay tuned to this blog or the Alpha Stamps blog for more information on that.
I am going to show you how to keep the glass in your shadowbox while making it open and close on command ;)
I like to have the glass there to keep the dust out and having the frame front removable, makes it reusable as a display box if you don't permanently glue the displayed pieces into the box.
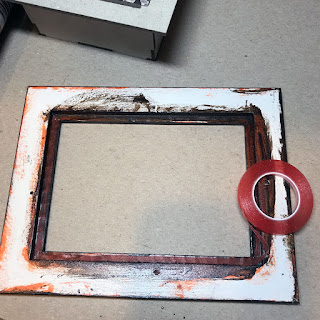
To permanently affix the glass inside the frame, I ran a strip of Super Sticky Red Liner Tape all the way around the inside ledge of the frame (where the glass usually sits). Remove the red backing, clean the glass, then adhere to the red liner tape. Simple and effective!
For a removable frame, I started by lining the frame up so it was where I wanted it to be when finished. Then I flipped it over and marked the corners with a marking pen.
 Making "L" shaped marks around all of the corners (of the shadowbox backing) is important to the placement of the "Velcro" fasteners we will use to make it removable.
 You can use any brand or color of fasteners you have on hand. I used the one below and I got it at Target.
Cut a piece of each "side" of the fasteners about 1.5" long.
 Then cut those pieces into four equal pieces as shown below.
 Apply the four "fuzzy" pieces of fastener to the four corners of the shadowbox. Then apply the four pieces of the "pointy" fastener to the "L" shaped marks we made on the back of the frame.
 Line up the fasteners facing each other and press.
The shadowbox and frame should now be firmly affixed together but with the fasteners it can be gently removed and replaced again and again :)
I hope you enjoyed this quick post and it inspires you to make your own little Halloween shadowbox. If you would like to use any of the items I used, in my shadowbox, you can find my supply list here.

Saturday, August 1, 2015

a Creepy Goblin Cemetery and a new Snapguide tutorial...

I can't believe there are only 105 more days until Halloween! Where has the time gone?! I really need to start churning out more Halloween projects! Those were my thoughts when I started working on this mini graveyard scene...
I LOVE Halloween and August's Cemetery Kit at Alpha Stamps is all about cemeteries and Halloween. I relied heavily on both the Cemetery Kit and the Cemetery Add On Kit for this project and I'm really happy with how it turned out. Let me give you a tour around the place... here's the view from above...
 It's just a little bit creepy... how about a closer view...
Yiikes! It looks like someone has been digging up the coffins. Huh, probably just an old witch looking for goblin bones to use in her latest evil spell.
 Hey! Look at the eyes on those crows... they seem to be glowing red!
Maybe they had some help with the new Red Demon Eyes - LED lights.
If you want to add some awesome LED lights to your project click here for a quick tutorial I created on Snapguide. Here's a photo of my project from the tutorial...
It's a tribute to one of my favorite movies...
Kiss of the Spider Woman
If you're looking for my list of supplies for these two creepy cemetery projects click here for the Creepy Goblin Cemetery and click here for Kiss of the Spider Woman Box.
Thanks for stopping by and reading all the way to the end! Now go make something spooky!

Sunday, July 19, 2015

Sugar Skulls...

It's been a while but Alpha Stamps is resurrecting swaps! First up is a sugar skull swap and boy am I ready! I even created a collage sheet for the occasion. Here's what my swap entries look like...
Yes, I used my new collage sheet all over them! I also used plenty of glitter and other goodies from my stash and from Alpha Stamps.
My favorite of this group is the devil.
I think he's pretty handsome with his gold tooth and faux suede horns.
While I was working on my sugar skulls, I kept thinking about this years Dia de los Muertos (or Day of the Dead) festivities. The cemetery where my Mom is buried is open for Day of the Dead vigils and will place a lit candle on the grave of your loved one for a small fee.
I like to go out and spend some time graveside with Mom on this night and decided to make a traditional shrine to decorate her gravestone along with the traditional marigolds.
I think she'll love it :)
If you're wondering where I got the lovely white skeleton, it's actually one of the plastic skeletons we sell at Alpha Stamps. It started out black but quickly became white with a coat of gesso and a couple of coats of white spray paint.
I hope you'll join me for the sugar skull swap, you can find all of the details here.
Thanks for stopping by and have a creative day!

Saturday, April 11, 2015

a haunted sunken ship shadowbox in a miniature suitcase...

It looks like a miniature suitcase with buckles and labels and all of the other things you'd expect a suitcase to have... But, when you open it up there the similarities end...
Inside awaits a tiny haunted world from a past era when sailing via ocean liner was all the rage. Unfortunately, for our occupants this ship is resting somewhere on the bottom of the ocean.
There is lots of luggage in this stateroom including a nifty steamer trunk stuffed full of travel things (such as the tiny passports and tags).
The occupant of this stateroom is a bit indisposed at the moment. It doesn't look like he will be finishing his breakfast anytime soon.
I hope you've enjoyed my little sea journey. I created it with stuff I got at Alpha Stamps, including a new collage sheet with the luggage boxes I designed exclusively for Leslie (the Queen of Alpha Stamps). To help you put the boxes together, I created my very first Snapguide Tutorial. It's super easy to follow and I hope you will make some sweet little luggage boxes for your own artsy project.