The Oxford Dictionary defines "wise woman" as a woman considered to be knowledgeable in matters such as herbal healing, magic charms, or other traditional lore. That is the kind of woman I envision using this apothecary cabinet.
She would keep all of her herbs and other ingredients
in well labeled, tightly covered, glass jars so nothing would be
misplaced or misused.
She would have lots of books, scrolls, and papers to
fill up those two large drawers, and yes, sometimes, to leave stacked on
the worktop. Her mortar and pestle would be well used and perhaps a bit
dented.
Her apothecary cabinet would be kept orderly and well stocked.
I used the brand new and wonderfully versatile Storage Hutch and 4 Inch Wide Chest of Drawers - 2 Drawers as the base for my apothecary cabinet. A bit of Dresden trim, some box feet and four skulls, used for drawer pulls, helped give the cabinet a spooky style.
Using my recently designed Tiny Little Grimoires Collage Sheet I made an open book to display on the cabinet worktop. I took photos while I assembled it so I could do a little tutorial to share :)
Carefully cut out the following pieces from the collage sheet. You will also need to cut out a piece of patterned or colored paper to use as a backing to the book cover.
Glue the backing paper to the back of the book cover, print or color side out.
Trim off any excess paper.
Ink the edges of the book pages and the cover.
Score the pages as shown below.
Glue the first set of pages as shown below.
Using a large wooden dowel or a pen, bend your pages as shown, to give them the curve of open book pages.
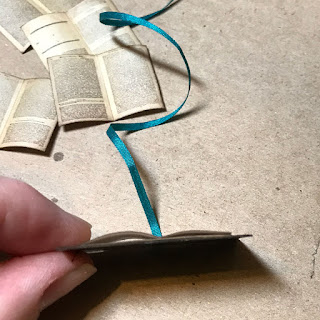
If you want a ribbon book mark, glue a thin ribbon to the book as shown.
Next, glue the curved pages into the middle of your book as shown.
They should look like this from the side.
Continue to glue the curved pages on top of each other until you have a stack you like.
It will look more realistic if some of the pages are slightly offset and a corner or two is bent.
Next, glue the ribbon in place as shown.
Then, using sharp fabric scissors, cut the ribbon to size and trim the end into a v shape.
Glue a couple of papers on top if you want your book to look like it's in use.
There you have it! Just a few simple steps to making an open book for your miniature scene :)
I hope you enjoyed this post and thanks for taking the time to read it. If you would like to view my supplies list, it can be found here.


No comments:
Post a Comment